Sending mail through the console with authorization in Linux

Sending mail through the console: In order to be aware of everything that is happening on the server, in addition to monitoring, it is useful to follow the standard letters that various services send. I'll tell you how to configure the server to send messages via standard postfix with authorization on a third-party SMTP server. Also, this setting will be used for sending mail through the Linux console with SMTP authorization.
By default, the minimal installation of the CentOS 7 distribution already includes the postfix mail server. I will use it. Standard server settings do not provide normal capabilities for sending mail. We will make some additional actions.
How to send mail through the console?
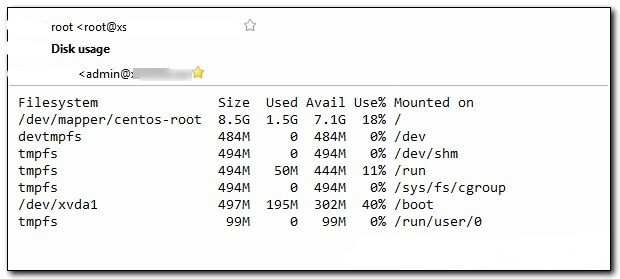
First, to be able to quickly check the sending of mail through the console, install the program mailx. Without it, when you try to send a message to the console, you will receive an error: # mail bash: mail: command not foundIn order to fix this, install mailx. # yum install mailxAfter that, you can send messages from your server to the outside world, for example, like this. # df -h | mail -s "Disk usage" admin@mymail.comThe output of the df command will fly to the mail.

But with standard settings, your email will either be spammed or not received at all by the recipient server, because your server does not have the correct settings for sending mail (DNS entries, SPF, dkim, etc.). For the mail to be sent normally, you need to use an external mail server. Set up postfix to send local emails through an external server with SMTP authorization.
I took the default postfix configuration, cleared it of comments and spaces, added my settings to the end.
# cat /etc/postfix/main.cf## DEFAULT CONFIG BEGIN ###################### queue_directory = / var / spool / postfix command_directory = / usr / sbin daemon_directory = / usr / libexec / postfix data_directory = / var / lib / postfix mail_owner = postfix inet_interfaces = localhost inet_protocols = all unknown_local_recipient_reject_code = 550 alias_maps = hash: / etc / aliases alias_database = hash: / etc / aliases debug_peer_level = 2 debugger_command = PATH = / bin: / usr / bin: / usr / local / bin: / usr / X11R6 / bin ddd $ daemon_directory / $ process_name $ process_id & sleep 5 sendmail_path = /usr/sbin/sendmail.postfix newaliases_path = /usr/bin/newaliases.postfix mailq_path = /usr/bin/mailq.postfix setgid_group = postdrop html_directory = no manpage_directory = / usr / share / man sample_directory = /usr/share/doc/postfix-2.10.1/samples readme_directory = /usr/share/doc/postfix-2.10.1/README_FILES ## DEFAULT CONFIG END ###################### # The name of the server that the hostname command displays myhostname = centos7-test.xs.local # Here, logically, you need to leave only the domain, but in this case it is better to leave the full name of the server to the sender field # the full name of the server appeared, so it's more convenient to parse service messages mydomain = centos7-test.xs.local mydestination = $ myhostname myorigin = $ mydomain # The address of the server through which we will send mail relayhost = mailsrv.mymail.com:25 smtp_use_tls = yes smtp_sasl_auth_enable = yes smtp_sasl_password_maps = hash: / etc / postfix / sasl_passwd smtp_sasl_security_options = noanonymous smtp_tls_security_level = may
Create a file with information about the username and password for authorization.
# mcedit / etc / postfix / sasl_passwdmailsrv.mymail.com:25 admin@mymail.com: password
Create a DB file.
# postmap / etc / postfix / sasl_passwd
Now you can restart postfix and test the work.
# systemctl restart postfix
We send the test letter through the console. Check the mail log.
# tail -n 10 / var / log / maillog
If you have a similar error there:
postfix / smtp [5420]: warning: SASL authentication failure: No worthy mechs found postfix / smtp [5420]: 24762774C6: to = <admin@mymail.com>, relay = mailsrv.mymail.com [10.10.30.3]: 25, delay = 450, delays = 450 / 0.03 / 0.02 / 0, dsn = 4.7.0, status = deferred (SASL authentication failed; can not authenticate to server mailsrv.mymail.com [10.10.30.3]: no mechanism available)
Then you need to install several more packages:
# yum install cyrus-sasl cyrus-sasl-lib cyrus-sasl-plain
After that, restart the postfix and check the sending in the console. If everything is fine, then to the standard alias for root in / etc / aliases, add an external address where the mail addressed to root will be duplicated. To do this, edit the specified file, changing the last line.
It was:
#root: marc
Became
root: root, admin @ mymail.com
We update the certificate database:
# newaliases
That's all. Now all the letters addressed to the local root, for example, reports from corn, will be duplicated to an external mailbox, with sending via an external normal mail server. So the letters will be delivered normally, without getting into spam (although not necessarily, there are also heuristic filters). Now it is convenient to use local sending in scripts, without specifying additional parameters. Everything is already configured, you can use simple local delivery.


