Clearing app cache on Android can drastically improve your device’s performance, free up valuable storage, and fix unexpected app glitches. If your apps are lagging or your phone feels slow, the culprit might just be excess cached data. This guide will take you through everything you need to know about app cache, why it’s important, and how to clear it safely.
What is App Cache on Android?

Every time you use an app on your Android device, it stores temporary data called “cache.” This cache includes files, images, and other media to help the app load faster the next time you open it. While it’s helpful for performance, excessive cached data can pile up and take a toll on your device’s storage.
Why Does Cache Build Up?
Cache builds up because apps constantly store data for a smoother user experience. For instance:
- A browser app caches website images for faster loading.
- Social media apps cache videos and photos to reduce loading times.
- Games store progress and assets locally for quick retrieval.
Over time, this accumulated data can clog your storage, leading to slower performance or app crashes.
Why Should You Clear App Cache on Android?
Clearing app cache has several benefits, including:
- Freeing Up Storage: Cached files can take up gigabytes of space over time.
- Boosting App Performance: Removing outdated cache ensures apps run smoothly.
- Fixing Glitches and Errors: Clearing cache can resolve issues like app freezes, crashes, or errors.
- Enhancing Battery Life: Reduced background data usage can optimize battery consumption.
However, clearing the cache only deletes temporary files. It doesn’t erase app data like login credentials, saved settings, or user preferences.
When Should You Clear App Cache?
Knowing when to clear cache is key to maintaining optimal performance. Here are some scenarios:
- Apps are crashing or behaving erratically.
- Your Android device is running out of storage space.
- You’re experiencing lag or slow performance.
- Updates to apps cause glitches.
- You’re troubleshooting app-related issues.
How to Clear App Cache on Android: Step-by-Step

Clearing Cache for a Single App
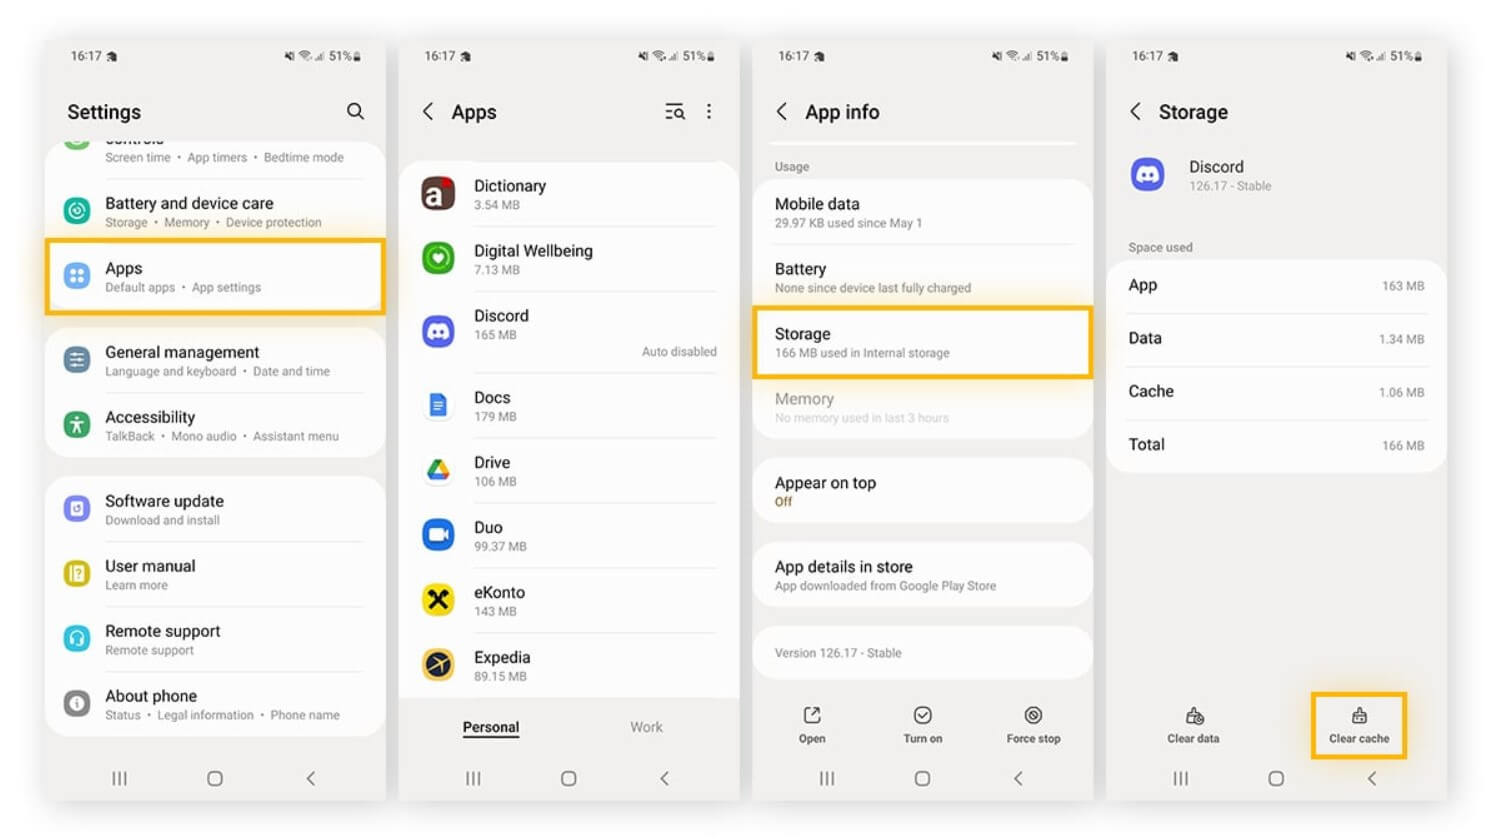
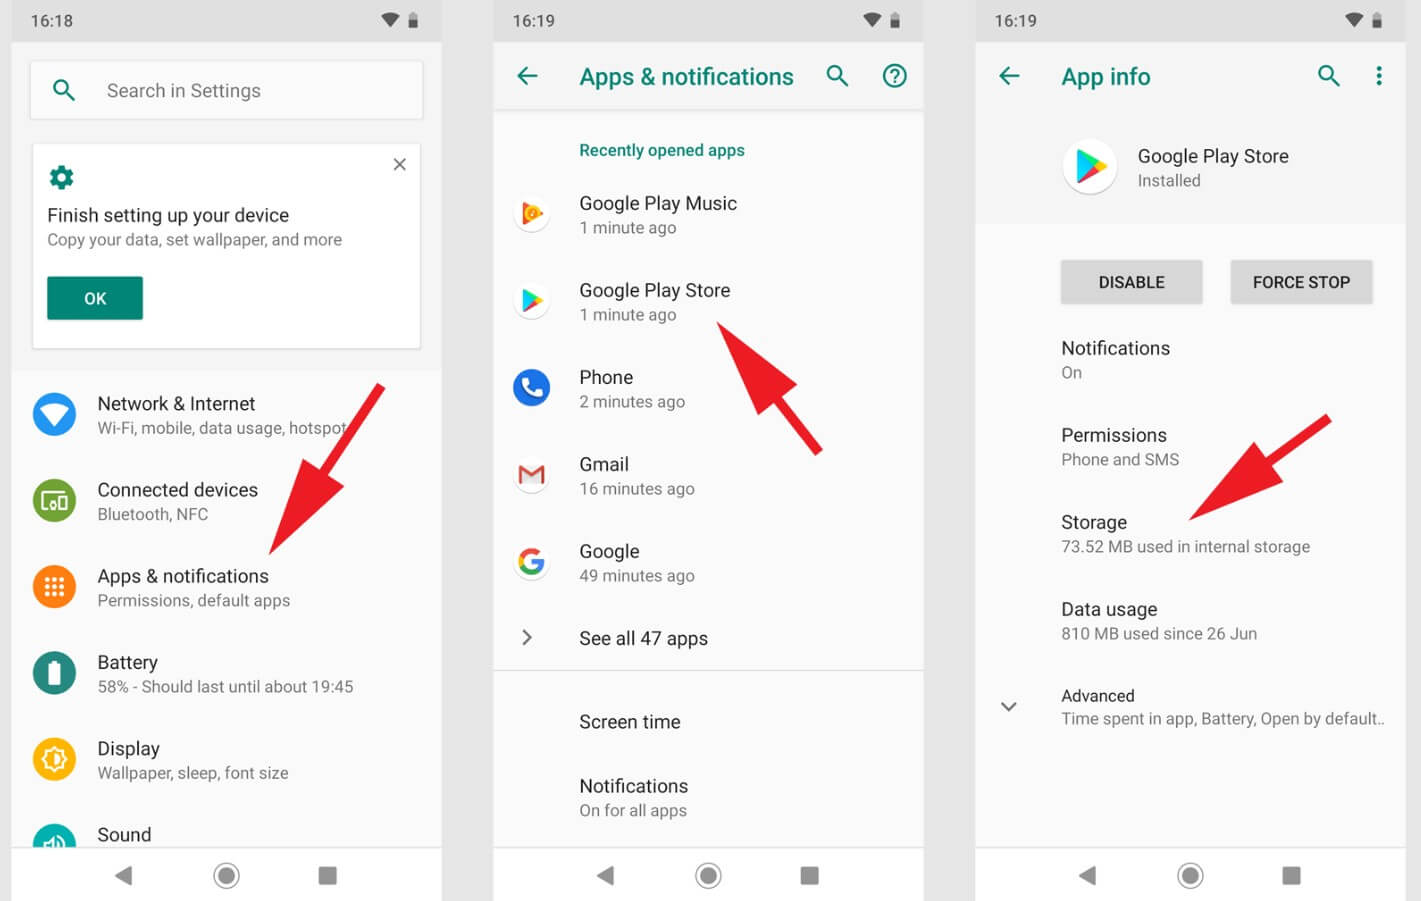
- Go to Settings: Open the Settings app on your Android device.
- Select Apps or App Management: Locate and tap the Apps section. It may also appear as App Management or Applications depending on your device.
- Choose the App: Scroll through the list and select the app whose cache you want to clear.
- Tap on Storage or Storage & Cache: This section shows how much storage the app is using.
- Click Clear Cache: Tap Clear Cache to delete temporary files.
Pro Tip: Be cautious not to click Clear Data unless you want to reset the app completely.
Clearing Cache for All Apps
If you want to clear cache for all apps simultaneously, follow these steps:
- Open Settings: Navigate to Settings on your device.
- Go to Storage or Device Care: Tap on Storage (or Device Care on Samsung devices).
- Select Cached Data: Look for the option labeled Cached Data or Other Apps Data under storage details.
- Confirm Clearing Cache: Click Clear Cache to delete cached files for all apps.
Using Third-Party Cleaning Apps
If manually clearing cache feels tedious, you can use reliable third-party cleaning tools. Some popular options include:
- CCleaner: Lightweight and effective for cache management.
- Files by Google: Provides recommendations on what to delete, including app cache.
- SD Maid: Offers detailed cache cleaning and file organization features.
Note: Always download cleaning apps from the Google Play Store to avoid malware.
How to Clear Cache on Specific Android Versions
Android 12 and Above
- Open Settings and go to Apps or Applications.
- Choose an app, then tap Storage & Cache and select Clear Cache.
Android 10 & 11
- Open Settings, then navigate to Storage.
- Select an app and tap Clear Cache.
Android 9 and Below
The process is similar, but some options may be under Device Maintenance or App Info.
Is It Safe to Clear App Cache on Android?
Yes, clearing app cache is completely safe and does not delete personal data. Cached files are temporary and can be recreated when you use the app again. However, clearing cache too frequently can lead to apps taking slightly longer to load as they rebuild their cache.
Clearing Cache vs. Clearing Data: What’s the Difference?
- Clearing Cache: Deletes temporary files while keeping your app settings, login credentials, and preferences intact.
- Clearing Data: Resets the app to its default state, erasing all settings, accounts, and saved data.
Always use Clear Cache unless you need a full app reset.
How to Automate Cache Clearing
Built-in Device Tools
Some Android devices come with tools to automate cache clearing:
- Smart Cleaner on LG devices.
- Device Maintenance on Samsung.
Third-Party Apps for Automation
Apps like Greenify and SD Maid can automate cache clearing for specific apps.
Tip: Automating cache clearing can prevent storage issues without manual effort.
Benefits of Regular Cache Maintenance
- Improved Device Speed: Removing excess cache reduces lag.
- More Storage Space: Frees up gigabytes of storage.
- Longer Device Lifespan: Optimized performance reduces wear and tear.
- Better App Functionality: Minimizes app crashes and glitches.
FAQs
What happens if I don’t clear cache?
Over time, excessive cached files can consume storage, slow down your phone, and cause app glitches.
Can clearing cache harm my apps?
No, clearing cache is safe. Apps will recreate the cache when needed.
How often should I clear app cache on Android?
Clearing cache once every few months is sufficient, but you can do it more often if your device slows down.
Will clearing cache delete my saved passwords?
No, saved passwords and account settings are stored as app data, not cache.
What’s the difference between app cache and browser cache?
App cache stores temporary files for apps, while browser cache stores website data for faster browsing.
Can I clear cache for system apps?
Yes, but be cautious as clearing cache for system apps like Google Play Services might affect functionality temporarily.
Conclusion
Clearing app cache on Android is a simple yet effective way to boost your phone’s performance, reclaim storage space, and resolve common app issues. Whether you clear cache manually, use system tools, or rely on third-party apps, regular maintenance ensures your Android device runs smoothly. Follow the steps outlined in this guide, and enjoy a faster, glitch-free experience.


