Additional fields in Joomla 3.7+

Kind time of day everyone! In this post, I want to consider some features that appeared in Joomla 3.7 - these are additional fields in the materials. I consider this a useful addition to the standard component of com_content materials.
Earlier, because of several fields, it was necessary to install heavy content designers (CCK) and everything to make it easier for the user to work in the admin panel. In this article, we will just consider how to create additional fields in materials and how to display them on an external site.
As well as the field materials are grouped together, these are some kind of category. In order to create a group of fields go to the Admin panel -> Groups of fields. Create a group. Next, create the fields themselves. Here already for more options, go through the main.
"Basic" tab
Heading - here we enter the title of the field, we write it in such a way that it would be convenient for you to navigate through the created fields in the admin panel, and there may be a lot of them.
Type - select the type of the field: Text, Textarea, Url, Calendar, etc. I will not disassemble here in detail, nothing is complicated in them and they are all set up according to the same principle.
Name - we enter the field alias of the Latin alphabet. This is a kind of field indexer and it must be unique.
Name - here enter the name of the field that we want to see on the site. Generally by default, when you fill in the header, this field is filled in automatically, but you can override it.
Description - enter the description of the field.
Required - if this field is required when creating the material, then put the switch "Yes".
The default value - you can enter the value that should be substituted by default in this field.
Filter - here we choose the parameter for filtering the input data, for example, you want this field to accept only whole numbers. This filtering can be defined globally in the plugin settings of this field type.
Maximum length - you can limit the length of the input characters.
Category - on the right side of the screen, select the category for which the created field should be available.

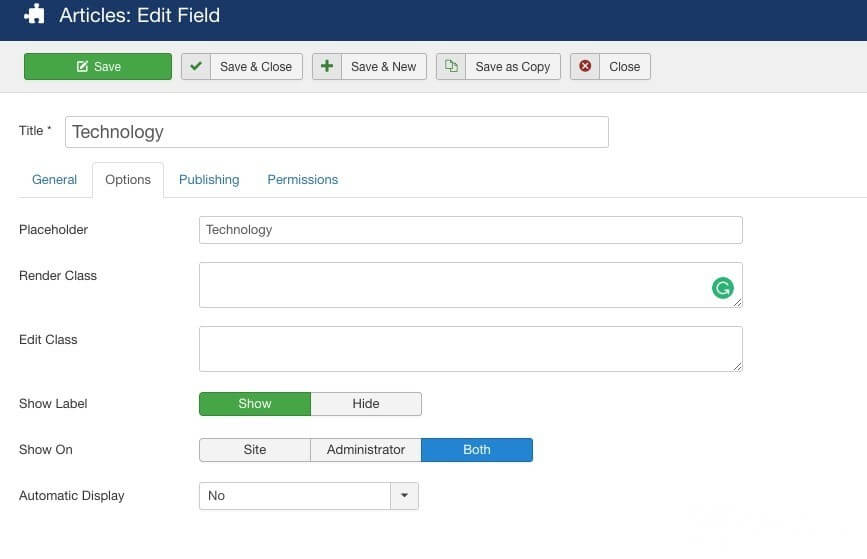
Options tab
Placeholder is a hint for the field. For example, you can enter a hint for your content manager.
CSS class to display - you can enter your field class to override the style in CSS.
Header field - controls the output of the field header on the site.
Automatic display - this is a useful option in my opinion. There are pre-defined settings:
- After Title - show the field after the title;
- Before Display - show before the text;
- After Display - show after the text;
- Do not automatically display - do not automatically show the field. This option provides the output of the field in the site template through the code. We'll talk about this below.

All, save the field and create materials. In the materials of the category that you assigned to the fields, a new tab will appear with the name of the field group. For me, it is called " Fields ".
I made the name of the field bold through CSS styles. At once I will say that through automatic output we do not have the opportunity to customize the template of the output fields. This can be done without automatic output.
The output of additional material fields in the Joomla template - manual mode
So, if you do not have predefined settings for the output of fields or you just want to edit the HTML-template of fields, that is, you can display fields anywhere in the template of the material and frame them with any tags. To display the field in the manual mode, you must first disable the automatic display of the field in the parameters. If this is not done, then the fields will simply be duplicated.
Next, we create a redefinition of the material output template for the " Article " type. If you do not yet have to override the com_content material template, then go to the Extensions -> Templates ->In the right column " Template " select your template -> Create Override -> com_content -> article.
After these actions, the following directory with the file should appear in the folder of your template. Your template -> html -> com_content -> article - default.php . We will work with this file. Open the template file of the material and insert the code to output the field in the right place. I inserted before the output code:
<?php echo $this->item->text; ?>Output field code
<?php
// GET CUSTOM FIELDS
    $myCustomFields = array();
    foreach($this->item->jcfields as $field) {
        $myCustomFields[$field->name] = $field->value;
}
// RECOVER CUSTOM FILED NAME
    if (isset($myCustomFields['field-1']) and !empty($myCustomFields['field-1'])) : ?>
        <div class="field">
            <div class="field__name">Field name:</div>
            <div class="field__value"><?php echo $myCustomFields['field-1']; ?></div>
        </div>
<?php endif; ?>
Instead, field-1substitute your alias field (the first screenshot of the settings, the "Name" field).
If you want to display more than one field, there is no need to re-copy the for each loop. This cycle must be declared above the output of the fields. And output the second field, for example, like this:
<?php // RECOVER CUSTOM FILED NAME
    if (isset($myCustomFields['field-2']) and !empty($myCustomFields['field-2'])) : ?>
        <div class="field">
            <div class="field__name">Field name:</div>
            <div class="field__value"><?php echo $myCustomFields['field-2']; ?></div>
        </div>
<?php endif; ?>Instead,field-2 the name of your field.
On this, I will conclude. Good luck to all!


